

Let’s set the record straight, you do not need to wax your skis to ski… but you should wax your skis if you want to have a good time on snow. Wax acts as a slippery lubricant that helps your skis glide faster and more consistently on the snow’s surface. There are a lot of waxes out there, and there are many techniques for waxing which can be daunting when you’re looking in to learn how to wax your own skis. While all Folsom skis have a universal wax applied to them before they leave the shop, there’s a myriad of wax out there that vary on temperature, application method, perfluorocarbon concentration, etc. Today, we’re going to focus on, and teach you, how we wax our skis at Folsom so that you can do the same at home.
A key thing to understand about waxing your skis, is that ski bases are actually filled with millions of microscopic pores which is where the wax gets deposited. The wax doesn’t sit on top of base, it’s meant to seep into the pores of the ski so that the “base structure” can do it’s work of dissipating heat. If you’re confused already, don’t worry – all you need to know is that wax melts into and stays in the tiny pores all throughout your ski’s bases.
Our waxing techniques are nothing groundbreaking or special, but they are effective and simple. That said, there are ways to damage your skis doing this, but if you follow the instructions and keep the iron moving, then there should be nothing to worry about!
To start, you’ll need these materials:
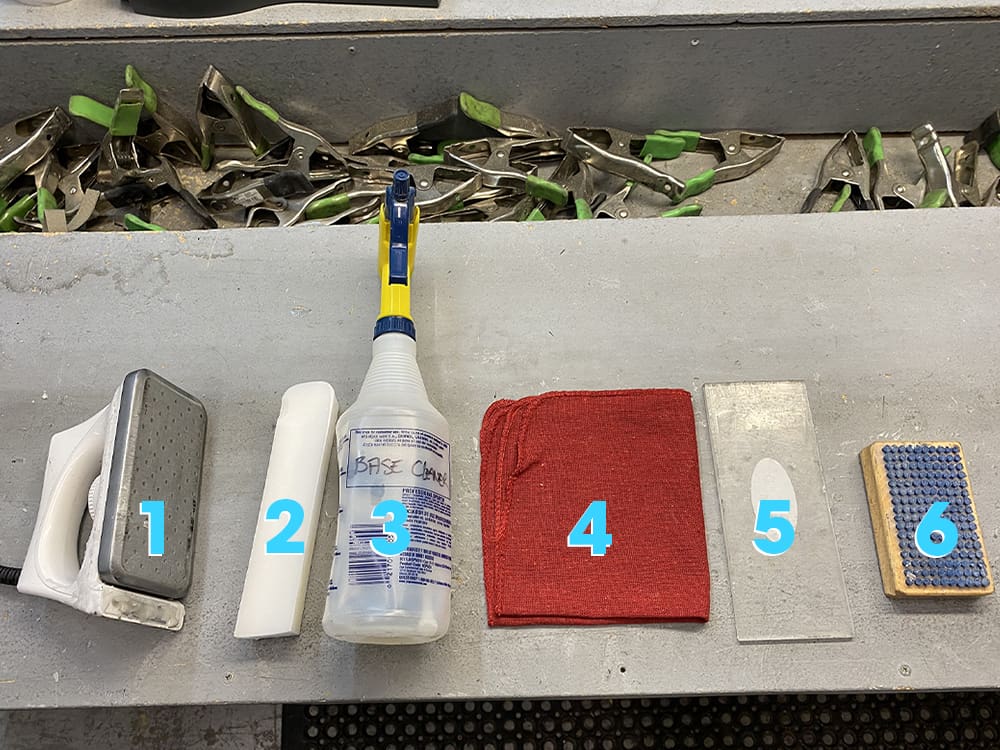
Your first step is to grab a strong rubber band or pen that will be able to hold the binding brakes back, so that you can wax the base of the ski unimpeded.
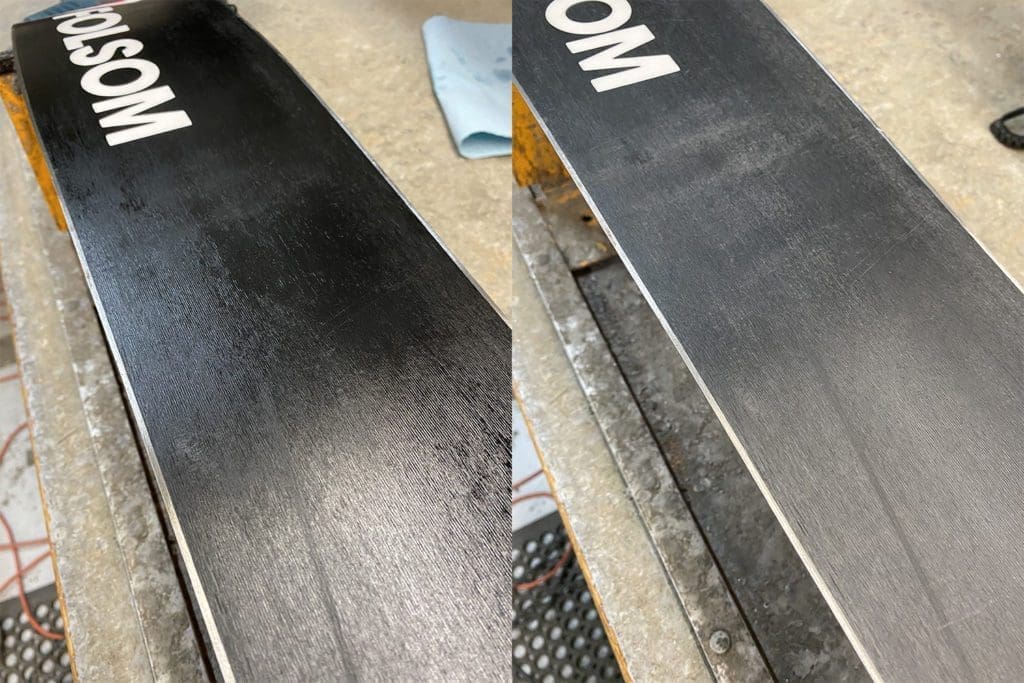
Next, you’ll need to clean your bases as best you can. We use a Base Cleaner Solution to get any small particles of dirt or debris out of the base of the ski. If you have any clumps of excess wax (typically near the tip or tail of the ski) you’ll want to use a plastic scraper to remove those as well. We clean our bases by first wiping off any excess water, spraying the Base Cleaner Solution in a couple spots along the length of the ski base, and spreading it using a clean rag. Make sure to get Base Cleaner spread from tip to tail, edge to edge to get the entire base of the ski. At this point, the base will look shiny and saturated, so we let it dry for about 15 minutes or until the Base Cleaner has fully evaporated.
The second step is to use your waxing iron to melt wax onto the base of the ski, and then to spread the wax around and into the pores / structure of the base. Once you have your ski(s) positioned horizontally on a table or waxing station and it’s completely dry of base cleaner, you should plug in your iron to heat it up to 140° Celsius. This should take no longer than a couple of minutes. Once the iron has heated up fully, press the wax into the surface of the iron to get it to melt off into droplets. It’s worth taking a minute and wasting a little wax to understand how quickly it melts off the iron onto the ski, so that you can gauge how much wax you’re using.
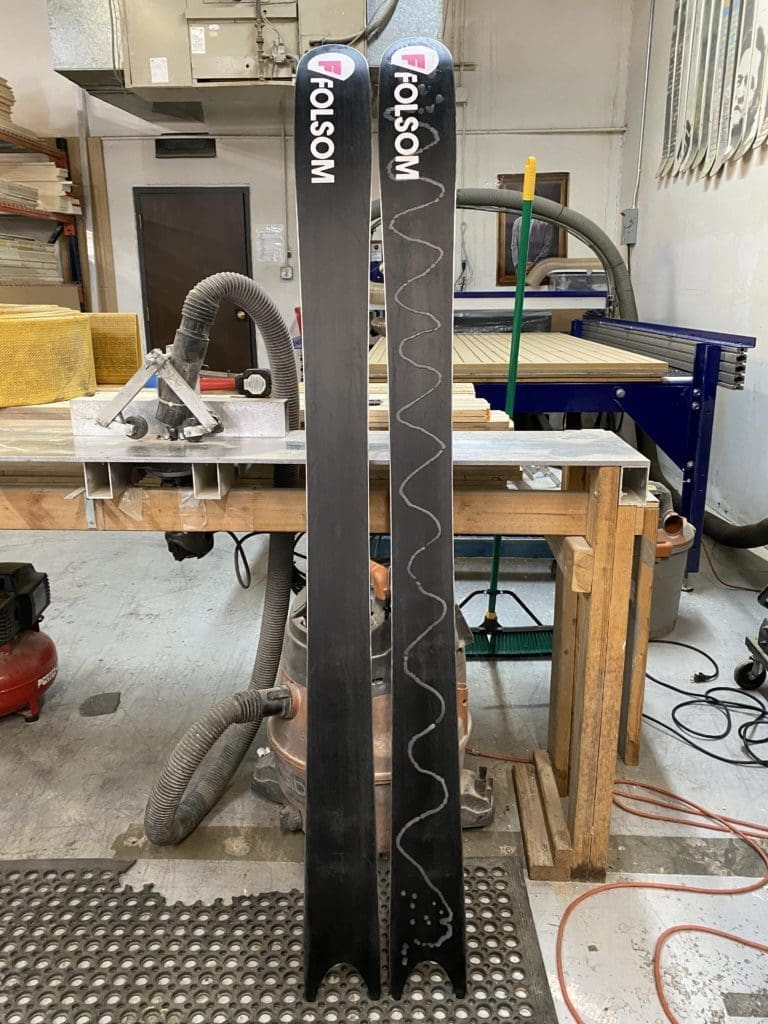
The next part definitely comes down to experience… Below is a photo of a wax pattern that we applied to a ski before spreading it around and into the base. Not everyone does the same pattern, and nothing is to say this is the perfect pattern, but this technician uses this wax pattern because they know it’s the perfect amount of wax to cover that ski’s base. The important thing to keep in mind here is that you’ll want to add enough wax to cover the base completely in a thin layer of wax, and to not add copious amounts of wax. Applying a lot of wax will guarantee that you’ve covered the base in full, but is pain to remove and is not necessary to having a well waxed ski (i.e. wasteful).
Next, you’ll want to use your iron, at the same temperature, to melt the wax into the whole base. If you’re going to pay attention to anything in this blog, it needs to be this: DON’T USE THE IRON IN CIRCULAR MOTIONS. The key to a good wax is moving linearly, from tip to tail and tail to tip. People will often use the iron in circular motions to get little spots that they missed the first time… don’t do this. If you do it the proper, tip to tail way, and spend a little extra time to make sure you covered the whole base, both your skis and your skiing experience on a freshly waxed pair, will thank you. Circular motions of the iron can leave scratches and damage your base.
Use the iron in linear motions, starting at the tip of the ski. You can apply about 10-20% pressure on the iron, just enough to make sure that it’s staying grounded and applying the heat as best it can. Pressing down too hard won’t hurt the base, you’ll just look really awkward with your whole body leaning on an iron. Starting at the tip of the ski, just make contact with the iron to the base, over the wax. Make sure to keep the iron moving because you can burn the base of your skis if the iron is kept in one spot for too long.
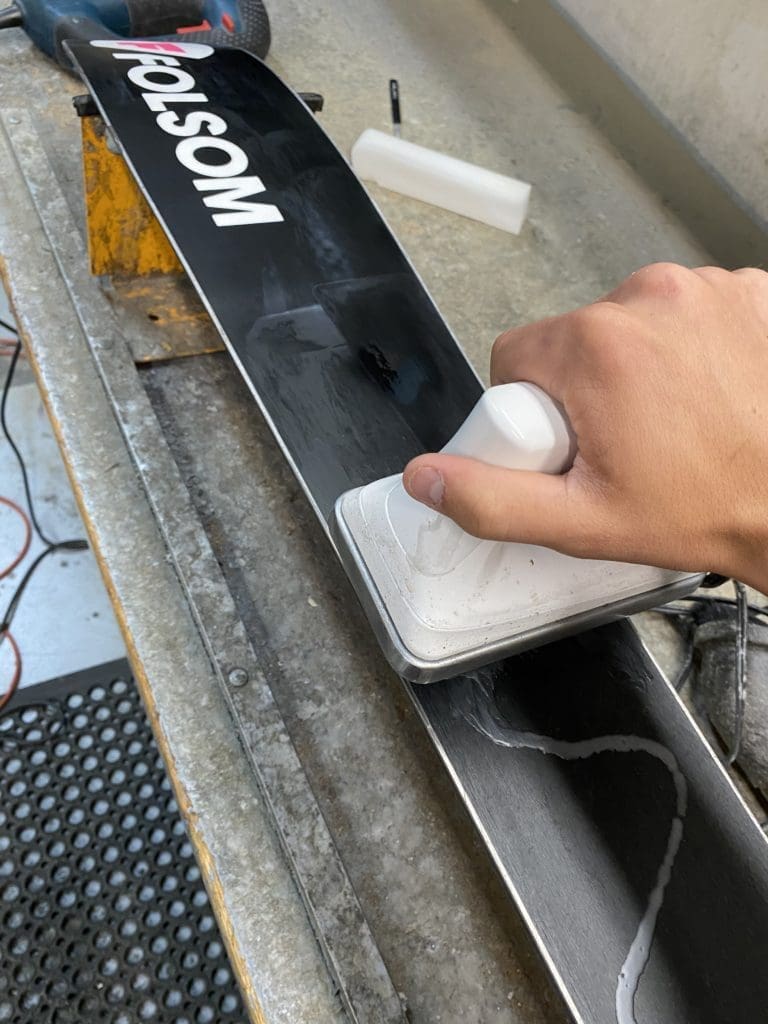
As you move towards the tail of the ski, just keep repeating the same linear motions until the whole base, from tip to tail, is covered in wax. If you missed any spots, that’s okay! Just go back and touch them up with another pass or two. Tilting the iron to one side or the other to change where the pressure on the base is another technique to try as you’re waxing because it’ll get wax near the edges a bit better if you have an iron with a slight curve in the plate. From here, wait a minimum of 20 minutes for your bases to cool. If you can let the bases cool and saturate with wax for more like 24 hours, that’s much more ideal, but not everyone has that time (especially if there’s morning powder to be had).
Scrapping the wax off the skis is exactly what it sounds like. Because the pores of the base are now saturated with wax, you should scrape off the top layer of wax to expose the base. The easiest (and cheapest) way to do this is to get a 3-5mm plexiglass scraper, check the edges to make sure they’re sharp, and starting at the tip of the ski moving towards the tail, scraping the wax off. We have found the best results by angling the scraper ~30° up from flat will remove the most wax, and won’t damage the base. Feel free to use pretty good force (~60%), and try to keep a consistent angle on the scraper.
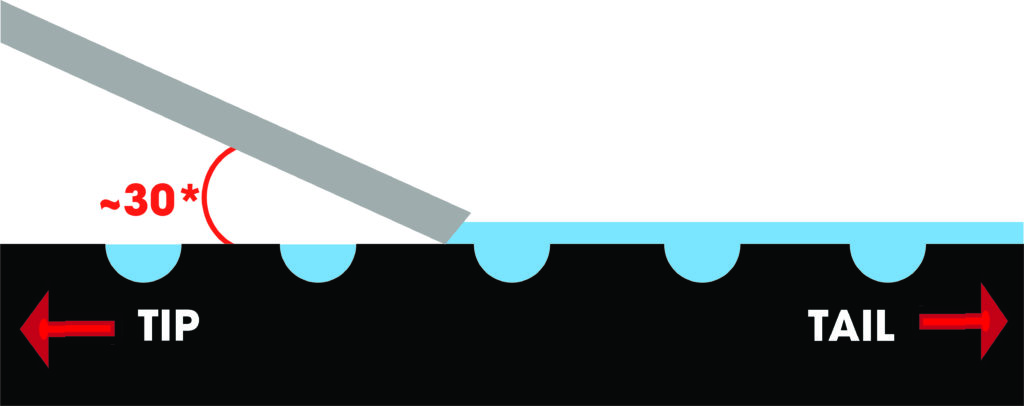
Remove enough wax so that there’s no clumps of wax anywhere, and so that you can see the structure of the base again. This will take a few minutes to get right, and the more you do it, the quicker it will become.
This next step is fairly optional and really only necessary if you want your skis to be that much faster. Grab yourself a nylon brush, and you guessed it, moving from tip to tail, make sweeping linear motions all the way down the ski using decent force to press down. By using this brush to clear out those small channels, it allows the wax to work a little bit better so you can ski that much faster.
Now that we know how to properly wax our skis, it’s important to cover storage wax during the summer months. You may have heard of this, you may have not, but if you have any intention of using the same skis for next season, it’s truly a necessity. A storage wax is a fresh coat of wax that has not been scraped off yet. As homes get warmer or if you leave your skis in the garage, the wax on ski bases can dry out and lose its effectiveness. So if you don’t apply a storage wax to your skis after the season ends and try to ski on the same wax at the beginning of next season, your skis will feel very slow and stick to the early season, wet snow.
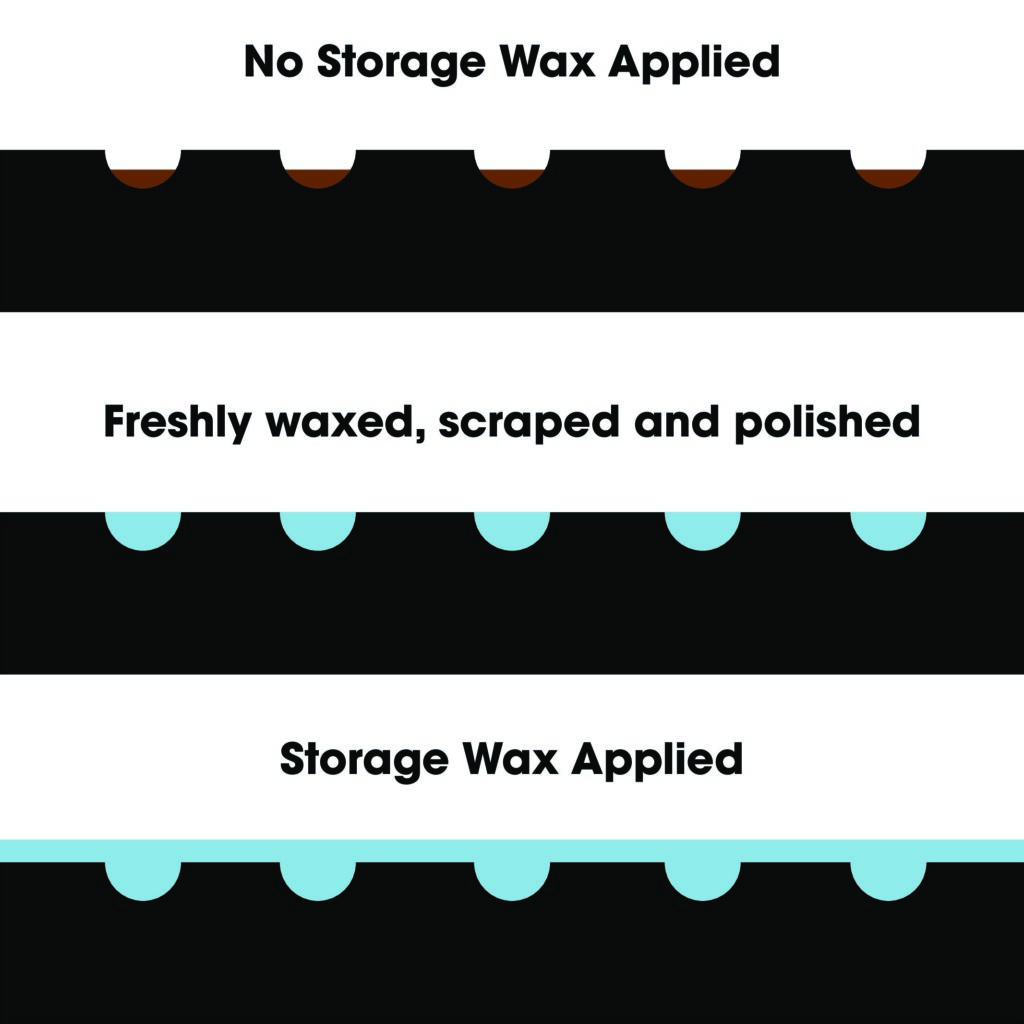
By applying storage wax at the end of the season, it will feel like a brand new, fresh wax after scraping right before your first ski day of the following season. Storage waxes also help to protect the bases and edges of the ski from absorbing moisture that can delaminate your skis. When the summer is over and ski resorts are opening back up again, all you will need to do is scrape off the wax and use a nylon brush to clean out the structure in the base.
Here at Folsom Custom Skis, every ski that leaves our doors has a fresh tune and wax on it. Because of the base material we use, we highly encourage customers to re-wax their skis after every 3-4 uses. Additionally, Folsom will happily re-tune and re-wax custom builds over the warmer months 1 year from your purchase date. Adult beverages are welcomed warmly in return for the service!